Catching up

Over the past few years I have made a lot of sawdust, added a few tools, and coaxed some useful things out of lumber in my wood shop. To help raise funds for a mission trip to Haiti a few years back I made a number of small boxes (my “signature” piece is a little sliding lid box that holds two decks of cards and 5 dice), tea-light candle holders of various shapes and styles, and some boxes that hold 3×5 index cards. I’ve made gifts for my family and friends, including various games (Quoridor, Quatro, Quarkle–the “Q-game” triumvirate), and more recently, a cribbage board and a set of wooden hexes and other pieces for Settlers of Catan.

I’ve made three chess sets with boards–the pieces were cut from square stock, not turned; the boards were in four pieces that are held together with rare-earth magnets, and both board and pieces were designed to fit into a box with a sliding lid.

I have made some useful jigs, including John Heiszman’s box-joint jig, among many others that were assembled for a time while needed then disassembled.

I’ve done some furniture repairs: several chairs of different types, both old and newer, and I fixed a friend’s table, the top of which had split at the glue joints. I also did a major (>$1k) commission project: a pair of dining tables for the deck of some friends who had just built a new home with a nice cedar deck. The tables were my own design–one was 3’x3′, the other had drop-down leaves, but when the leaves are up it measures 3’x6′. I made them out of cypress, with slat-tops. They turned out pretty nice, and I’ve had the pleasure of dining at my friends’ home, at one of those tables. It’s so nice to get to see someone use something you’ve made for them, and to see how it enriches their life.

I acquired a practically-new dust collector that has really made working in my shop a much more pleasant experience. It was an older Porter-Cable model that is no longer sold, but the previous owner had scarcely used it at all.

The wood shop continues to be a happy place for me; I always look forward to time spent there, and I hope to be able to spend more time there in the years ahead. It’s hard to beat the satisfaction that one gets from making something both beautiful and useful from wood.

Some photos of the router table and lift

I finished up (mostly) the router table project this weekend, and installed the router lift (and router). I’m happy to report that it works quite well, and I’m very happy with it. The only beef I have is that I apparently wasn’t careful enough when building the fence–it’s a teensy bit out of square. I may have to redo that.

Here are some photos (click on the thumbnails for full-size views):

IMG_1892 IMG_1894 IMG_1895 IMG_1896 IMG_1897

This has been a very enjoyable and rewarding project. And it cost me only $14 for the router lift plans (highly recommended, by the way), a few dollars for the bearings and other hardware for the lift, a bunch of scrap materials, and my time. (And a router, which I got for a great price at the recent Wood Show.)


And now I’m building a router table…

I apologize for not having photos of the router lift and my in-progress router table…I’ve had so little time in the shop recently that I’ve just been working feverishly in there and not thinking much about documenting the projects.  But the router lift is pretty much done! I haven’t put a finish on it, and I’m debating what to do about that–there are clearly some parts that shouldn’t receive a finish, but I’m thinking that finishing the other parts might keep the wood from being quite so subject to dimensional changes with humidity (or the lack thereof). So I’ll probably take it all apart and spray on some polyurethane at some point.

The router table is coming along, but taking a long time, it seems. Our weather here in the midwest has been so crazy this spring. As I write this, I’ve just come in from my garage shop, where the temperature was around 60 degrees (aided by a small electric space heater); outdoors it was only about 45 today. On Easter Sunday (two days ago), it was in the upper 50s or lower 60s. On Palm Sunday (just one week earlier) there was a 4-6″ blanket of snow in the morning. Just a few days before that we had temps in the 70s. But for the most part, it’s been sort of cold and snowy in the past few weeks. (And I’ve been busy with some other stuff, so shop time has been all too scarce.)

I modeled my router table after Rudolf Baumeller’s design (featured on woodgears.ca), though I didn’t pay that much attention to his dimensions. There are eight drawers in this design (four small ones, four larger ones), surrounding a central space for the router (and lift). As of tonight, all eight drawers have been constructed and fitted, but I still need to make and attach drawer fronts. There’s a ton of sanding to do, as well, and I still need to make the drawer pulls.

I haven’t decided how to construct the top yet. I have some 3/4″ MDF, but I’ve also got some 3/4″ birch plywood that would work. One more idea is a surplus kitchen counter top, left over from a kitchen remodeling project. It’s already got the laminate on it, and all I’d have to do is figure out how to cut it down to a useful size.

The materials I’ve used for the router table (and the lift, for that matter) are all just scraps I’ve had around the shop for a long time. Some of it is pretty crappy material, but I don’t have a lot of money to invest in the project, so I’ve had to make do.  The main frame of the table is made from 2×4 pine studs; the side panels are left over 5mm underlayment (from a bathroom remodeling project). The drawers are pieced together from various scraps of 1/2″ plywood (some old stuff that really is 1/2″ thick, and some that is really nasty sheathing or BC plywood, at best–about as flat as a potato chip. There are even some bits of 7/16″ OSB left over from my shop walls (and more of that 5mm stuff for the drawer bottoms). I’ve never had so many splinters from one project (hence the need for a LOT of sanding coming up).

routertableframeI modeled the frame in SketchUp (with very little detail), then added a drawing of the corner post joinery, just for reference. After I cut and milled all the parts and established the overall dimensions, I pretty much made the rest up as I went along. A bit of an adventure, but fun, and pretty cool to see it all come together.

The toughest part of this project will be figuring out where to put this table in my small, crowded, one-car garage shop. My old three-wheel bandsaw and stand can go away now that I have my new bandsaw, so that will help.

The spring is really my favorite time to be in the shop–it’s not beastly hot yet, and the bugs haven’t gotten bad yet, so I can work with the garage door open…


So I think I’m building a router lift.

At the Woodworking Show in Kansas City last month I found a pretty good deal on a Porter Cable 690 router–a pretty basic machine, but from what I gather, it’s a ubiquitous, fairly reliable workhorse of a router. I went to the show thinking I might look around for a good deal on a small trim router, like a Bosch Colt or one of the other similar models by other manufacturers, and there were a couple of deals on those. Maybe I’ll spring for a trim router one of these days, but I decided I didn’t really want to buy a set of 1/4″ bits (mine are all 1/2″ shanks), and it would be nice to have a reasonably hefty router installed in my router table all of the time. The PC690 is a 1.75-horsepower machine, which is just fine for the kind of routing I do at the table. It  came with a fixed base, which is also fine, since I’ll be using it in the table. (My Bosch 1617 has fixed and plunge bases.)

A couple of months ago I decided I was going to build a new router table–mine is a simple little thing I knocked together with MDF and mounted on a Workmate. It has served me well for a couple of years, but I really need something with some dust-collection capability (even though I don’t yet own a DC), and with some storage built-in. My fantasy was to have a router lift, but I just couldn’t imagine spending $300-$400 on one. For some time I’ve admired Matthias Wandel’s router lift project, and the most recent version is a tilting lift, which makes a given bit useful in additional ways. It always seemed too ambitious for my skills and my modest shop, but now that I’ve got a band saw…

So when I got home from the Woodworking Show I immediately ordered a set of plans from woodgears.ca, and now it appears I’ve got a fun project on my hands. I’ve decided to build it with materials I already have in the shop–this means that instead of purchasing some Baltic birch plywood (which I can’t get locally, anyway), I’ll be using birch plywood leftover from my vanity project. I have a little bit of hard maple, but I’m saving it for a guitar neck, so I’ll be using river birch for the hardwood parts (also left over from my vanity project). There’s some hardware to buy, but that’s not too expensive. I figure that if I use the wood I have on hand, I’m not really out anything except the cost of the plans and the cost of the hardware. If I decide that I really need nicer materials, I can always build it again later.
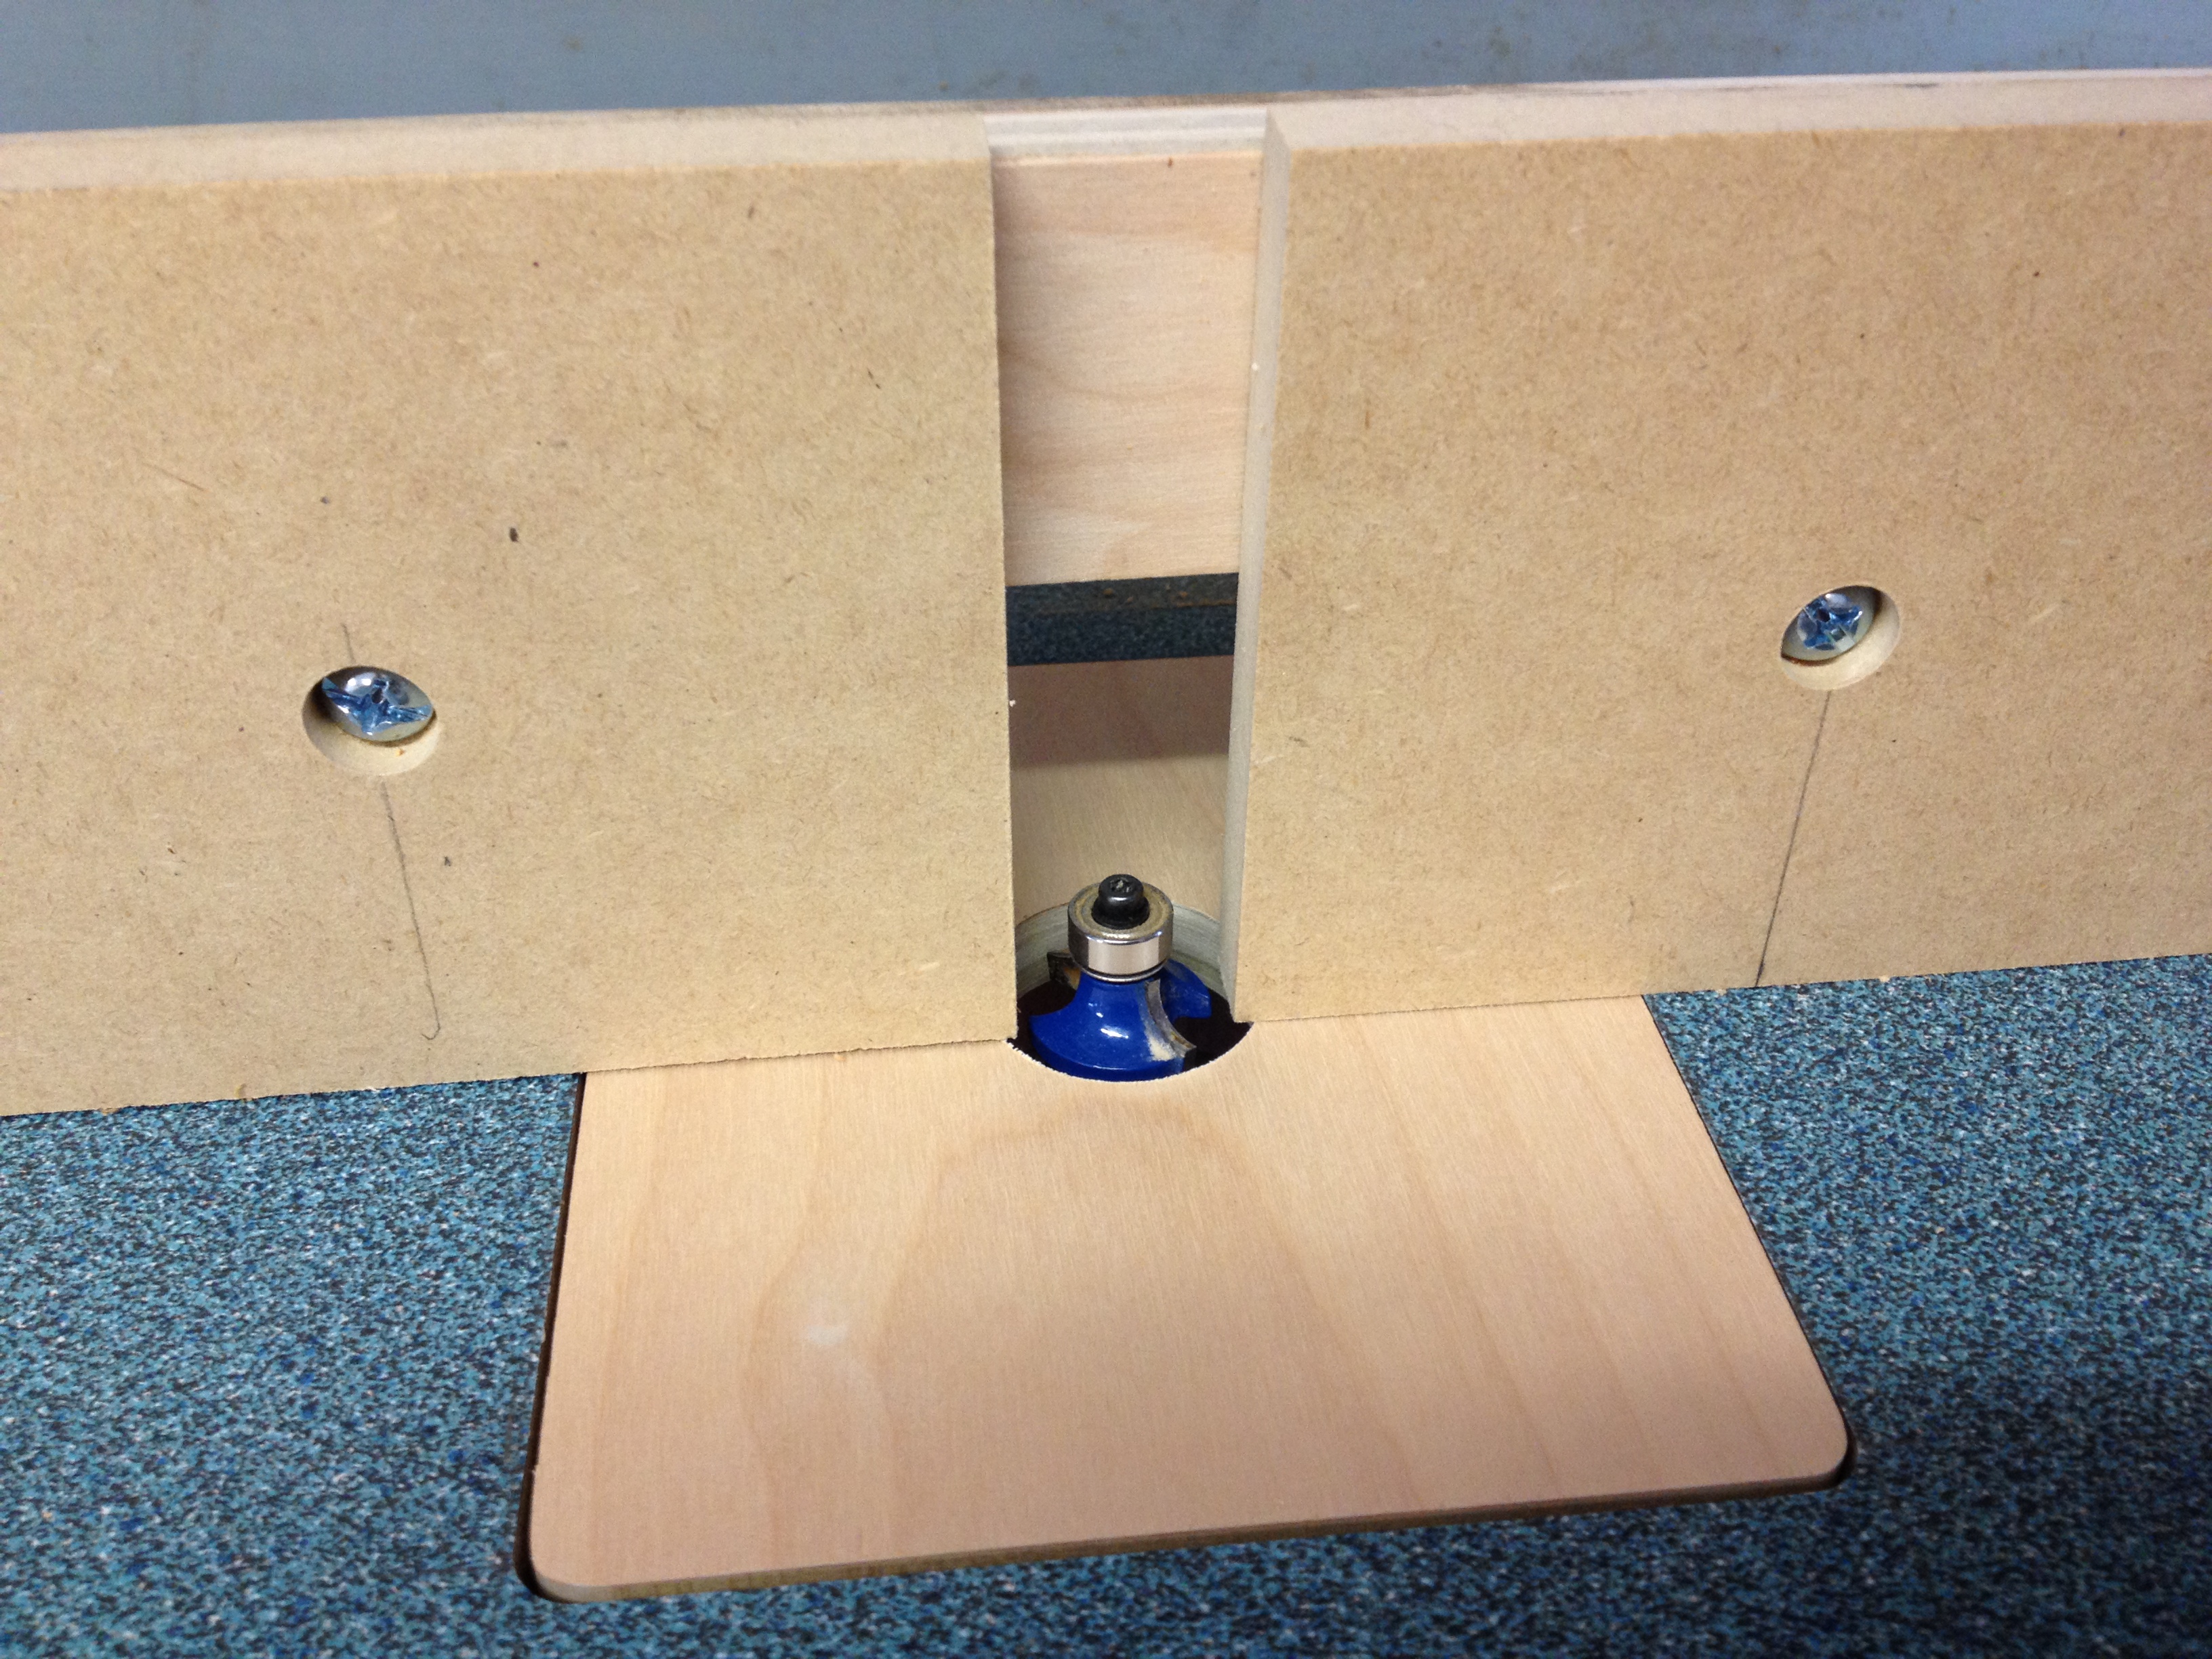
The slide mechanism

I started by cutting a couple of pieces of 3/4″ plywood for the sliding router motor carrier mechanism, and some hardwood strips for the runners. I also cut out the two gears from 1/2″ birch ply, and my preliminary tests indicate that they should work pretty well (although they’re a little rough, as it was my first time to cut wooden gears). I believe this speaks very highly of Matthias’ design. (Pictures will be posted soon.)  I had to make a minor modification to the router mount for my particular router motor, but I think it’s going to work out just fine.

The plans call for a plastic knob for locking the sliding carriage in place, but knobs are so expensive I decided to just make one from a scrap of maple and a hex nut, and so far it’s working great. This design uses a couple of ball bearings–one for the main gear and one for the lifting shaft. My local hardware store didn’t have the right size, but I would have paid up to $4 or so each if they had had them in stock. But when I saw that they’re price was more like $12-13 each, I decided I’d find another way. I went to a local skate shop and asked if they had skate bearings, because Matthias got his from old inline skates. Although the guy at the shop didn’t really know much about them, and I didn’t have a metric ruler on me (nor did he), I decided to take a chance.  These bearings were only available in packs of eight–for $11. So I gladly did that deal.

Except for the hinges, I pretty much bought all of the hardware specified–I figured even if I had some of it on hand, it would take me a lot less time and cost me less frustration to just go get the specific things I needed. I spent about $41 on hardware, including the bearings, but those costs include two boxes of different sizes of drywall screws, at about $6.50/box, and I only need a small handful of each size for this project. And as I said, I didn’t need all eight of those bearings. So I’m going to estimate that I’ve got about $20 invested in the hardware, at most. Given that all of the wood I’m using is scraps, including pretty much everything I’ll be using to build a new router table, that’s a really good investment.

More info (and photos) as the project progresses.

New tool gloat

Don’t have a photo yet, but my lovely wife gave me an early Christmas gift this year: a Grizzly G0555LX 14″ band saw.  It replaces the old Craftsman vintage saw I had been using–this is a really nice saw. I have a 1/4″ cheapo blade on it at the moment, which is working fine, but I’ve ordered a 1/2″ Wood Slicer resaw blade–looking forward to actually being able to resaw stock safely and accurately.  More to come on this.

Doll clothes rack

IMG_1641

This was a commissioned project–our pastor’s wife saw a clothes carrier for American Girl dolls online somewhere, and sent me a photo, asking if I could make something similar for her (a gift for her granddaughter). Looked easy enough, so I took the photo, modeled the thing in SketchUp, and built it in a couple of evenings. The beauty thing was that she wanted it unfinished, so she could paint it herself. Since finishing is my least favorite part of woodworking, this was like the ideal commissioned project.


Step stool gift

Now that my granddaughter is two and a half, she’s in need of a step stool to use the bathroom sink. I remembered that I had downloaded the step stool plans from Popular Woodworking’s “I Can Do That” series, so I gave it a go.  I had some beautiful, old, clear pine that I salvaged from my step-mom’s old built-in bookcases, so I planed it a bit to remove the old finish, and made this:

IMG_1682IMG_1683


I’m currently finishing it with some clear satin polyurethane. Hoping for enough warmer weather that it will be finished and dry before Christmas!

Vanity follow-up

The vanity project was completed earlier this fall, along with the rest of the bathroom remodel. Here are some photos of the completed vanity before and after installation.

The completed vanity in the shop, awaiting installation
   The completed vanity in the shop, awaiting installation 

Installed with top in place